Follow this ten-step process for archiving a Blackboard course and saving the zipped file:

- Under the Control Panel of your course site, click the Packages and Utilities menu item
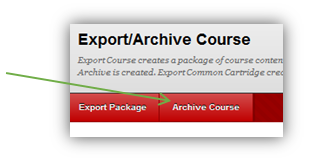
- Click on Export/Archive Course
- Click on the Archive Course button

- Check the box to include Grade Center history
(if grades are recorded within Blackboard) - Click the Submit button
- You should see a success bar near the top of the page
- An email will be sent letting you know when the archive process is complete - this may take several minutes, depending on course size
- Click the Refresh button in the main content window
- If using Mozilla Firefox, click on the link for the archived file, and select Save (do not select open)
- If using Google Chrome, click on the link, for the archived file
- a button will appear in the lower left corner above the start button
- DO NOT click this button
- go to Step 7
- To locate the saved file, open File Explorer(the file folder icon in the taskbar at the bottom of your desktop)
- Open the Downloads folder from the left navigation panel
- Right-click on the archived file, and select Cut
- Save the zip file by navigating to your H:/ drive or jump drive (or to a location on your personal computer)
- Then paste the file by right-clicking and selecting Paste
- It may help to create a new folder called "Archived Courses" - if you don't already have one
- You will need to provide this zipped file to the TLC should you need this course restored in the future
- After the file is saved to your computer (or jump drive), return to the Export/Archive course page within Blackboard, click the drop-down mean next to the archive file link, and choose Delete to remove the archive file from your course

Once the course has been archived (with the archived file saved to a location where you can find it and then deleted from within the Blackboard course), you can remove the students and begin to prepare the course to be used during a future semester (if you wish to use that one again). Visit our ICC Blackboard blog again next week when we'll cover steps for bulk deleting users from the course and preparing the course for a new semester.
View the Ending a Semester guide for a complete overview and step-by-step instructions for the entire process.
For additional assistance with End-of-Semester Blackboard tasks, contact the TLC at tlc@icc.edu or (309) 694-8908, or visit us in room 240A on the East Peoria campus.
For additional assistance with End-of-Semester Blackboard tasks, contact the TLC at tlc@icc.edu or (309) 694-8908, or visit us in room 240A on the East Peoria campus.
No comments:
Post a Comment