After archiving your Blackboard course and saving the zipped file (should you need the course restored in the future), it's time to remove students from the course and prepare it to be used during a new semester.
Bulk Delete Users/Groups/Statistics
Bulk Delete removes users (students) and materials from a course site in order to prepare it to be used over again for a new semester. This is a permanent process - be sure that the archive process has been completed first; then follow these five steps for removing users.

- Under the Control Panel of your Blackboard course site, click the Packages and Utilities menu item
- Click on Bulk Delete
- Check the parts of your Blackboard course you would like to delete - following are the minimum recommendations for course materials to be deleted:
- Users / Groups / Statistics
- You may also wish to delete announcements if you do not plan to use the same announcements for a future semester
- NEVER bulk delete the Grade Center (as this will cause parts of your course to not function at all)
- Type the word Delete (with a capital D) in the confirmation textbox
- Click Submit
Please note: Not all student-submitted materials are removed from the site. Students' individual entries in discussion boards, blogs, journals, and wikis must still be deleted within those tool areas.
Update Course for New Semester
Once users/groups/statistics have been bulk deleted from the site, instructors should begin to check through all parts of the site to ensure that all content is up-to-date and ready to present during the following semester (prior to requesting a batch enrollment into the course). The following ten steps were taken from our Beginning A Semester guide for Blackboard instructors:
- Ensure that all students, statistics, and other information from past semesters has been removed (bulk delete process)
- Update information within your site – review items such as the syllabus, your contact information and office hours, assignment schedules/course calendars, and class policies
- Review the Announcements, and delete or update them as necessary; also set dates for announcements to display as necessary (all announcements can be removed within the Bulk Delete process)
- Remove asssignments and other materials you are not using this semester, or make them unavailable to your students – this includes materials provided by the textbook publisher when you are no longer using the book
- Review your current assignments – update instructions, attachments, point values, and due dates as needed
- Review discussion boards, blogs, wikis, and journals – delete entries from previous students, update instructions, check due dates and point values for any graded forums
- Review manually-created columns within the Grade Center – remove any manually-created columns that are no longer needed, update due dates, add new columns as needed (for any assignments to be submitted in person, rather than via Blackboard)
- Organize columns within the Grade Center (from the Manage > Column Organization option), and hide/unhide as needed (hiding columns within the Grade Center only hides them from the instructor; students can still see these in their My Grades area); use Hide from Students to hide columns from students
- Check all links to ensure they are functioning correctly – this is especially important for external links, which could have changed or might have been removed from the Internet since the course was last used
- Check availability settings for course content, discussion boards, announcements, tests/surveys, and assignments
View the Ending a Semester guide for a complete overview and step-by-step instructions for the entire end-of-semester process.
For additional assistance with End-of-Semester Blackboard tasks, contact the TLC at tlc@icc.edu or (309) 694-8908, or visit us in room 240A on the East Peoria campus.
Next week our Blackboard Users' Group will meet in the TLC on Wednesday, May 4 at 12noon or Thursday, May 5 at 3pm - participants may attend either session.
Once you have backed up the Grade Center to Microsoft Excel, it's time to archive the entire course. Archiving a course site creates a backup copy of the entire course site, including all of the materials, settings, student files, and grades. This process will package your Blackboard course (as it exists when you archive it) into a zipped file that you save, should the course need to be restored in the future. Archived files must be restored by the Teaching and Learning Center (TLC) staff before you will be able to view any of the contents. It will be necessary for you to provide the zipped file to the TLC when you need to have a course restored.
Follow this ten-step process for archiving a Blackboard course and saving the zipped file:
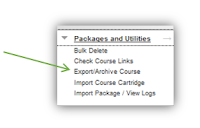
- Under the Control Panel of your course site, click the Packages and Utilities menu item
- Click on Export/Archive Course
- Click on the Archive Course button
- Check the box to include Grade Center history
(if grades are recorded within Blackboard)
- Click the Submit button
- You should see a success bar near the top of the page
- An email will be sent letting you know when the archive process is complete - this may take several minutes, depending on course size
- Click the Refresh button in the main content window
- If using Mozilla Firefox, click on the link for the archived file, and select Save (do not select open)
- If using Google Chrome, click on the link, for the archived file
- a button will appear in the lower left corner above the start button
- DO NOT click this button
- go to Step 7
- To locate the saved file, open File Explorer(the file folder icon in the taskbar at the bottom of your desktop)

- Open the Downloads folder from the left navigation panel
- Right-click on the archived file, and select Cut
- Save the zip file by navigating to your H:/ drive or jump drive (or to a location on your personal computer)
- Then paste the file by right-clicking and selecting Paste
- It may help to create a new folder called "Archived Courses" - if you don't already have one
- You will need to provide this zipped file to the TLC should you need this course restored in the future
- After the file is saved to your computer (or jump drive), return to the Export/Archive course page within Blackboard, click the drop-down mean next to the archive file link, and choose Delete to remove the archive file from your course
Once the course has been archived (with the archived file saved to a location where you can find it and then deleted from within the Blackboard course), you can remove the students and begin to prepare the course to be used during a future semester (if you wish to use that one again). Visit our ICC Blackboard blog again next week when we'll cover steps for bulk deleting users from the course and preparing the course for a new semester.
View the Ending a Semester guide for a complete overview and step-by-step instructions for the entire process.
For additional assistance with End-of-Semester Blackboard tasks, contact the TLC at tlc@icc.edu or (309) 694-8908, or visit us in room 240A on the East Peoria campus.
There is a three-part process we recommended that instructors complete on their Blackboard courses following the end of each semester:
- Back up Grade Center to Microsoft Excel
- Archive Course
- Bulk Delete Users
In this month's blog series, as we focus on topics for Ending a Semester in Blackboard, we'll take a look at each part and its purpose, as well as how to prepare your courses for the next semester, over the next few weeks.
Backing up your Blackboard Grade Center to Microsoft Excel will allow you to have full access outside of Blackboard to the data saved to the Grade Center, should any questions arise over student grades (once the students have been deleted), without the need to restore an entire archived course. The Blackboard Grade Center can be backed up to Excel at any point during the semester, but we recommend it especially at the end of the semester, once all grades have been entered and updated.
Update all Grade Center cells
- Before downloading the Grade Center to Excel, ensure that all grades are entered for all students and that zeros are entered for missing assignments so that the final grade is accurately calculated
Download file to Excel
- Once the entire Grade Center is updated, click the Work Offline button in the upper-right area of the full Grade Center
- Select the Download option

- Click Submit on the next screen, as the default options should work best
- When the Download Grades window appears, click the Download button
- Depending on whether you are using Mozilla Firefox or Google Chrome, take the following steps:
- Mozilla Firefox: A popup window will appear to indicate that the Grade Center will open in Microsoft Excel - select Open With Microsoft Excel, and click OK

- Google Chrome: A button will appear in the lower left corner above the start button - click this button to open the Excel document
Save the Excel File
- Within Excel select File > Save As
- Provide a file name for the document - it's helpful to include both the course name and semester (i.e., ENGL110_Fall2015)
- Select a location to save your Excel file
- H:/drive - if on campus - or jump drive or home computer
- It may help to start a new folder called "Grades" (if you don't already have one)
- Change the Save as type option from Unicode text (*.txt) to Excel Workbook (.xlsx) so that you can read the file within Excel (this step is extremely important so that you are able to read the file in the future)
- Click Save
- Close the Excel program
View the Ending a Semester guide for a complete overview and step-by-step instructions for the entire process.
For additional assistance with End-of-Semester Blackboard tasks, contact the TLC at tlc@icc.edu or (309) 694-8908, or visit us in room 240A on the East Peoria campus.
Visit our ICC Blackboard blog again in the next couple of weeks when we'll cover steps for archiving your Blackboard courses and bulk deleting users from the course.


